上一篇简单的看了下Widget的源码,发现Widget主要作用就是createElement()。
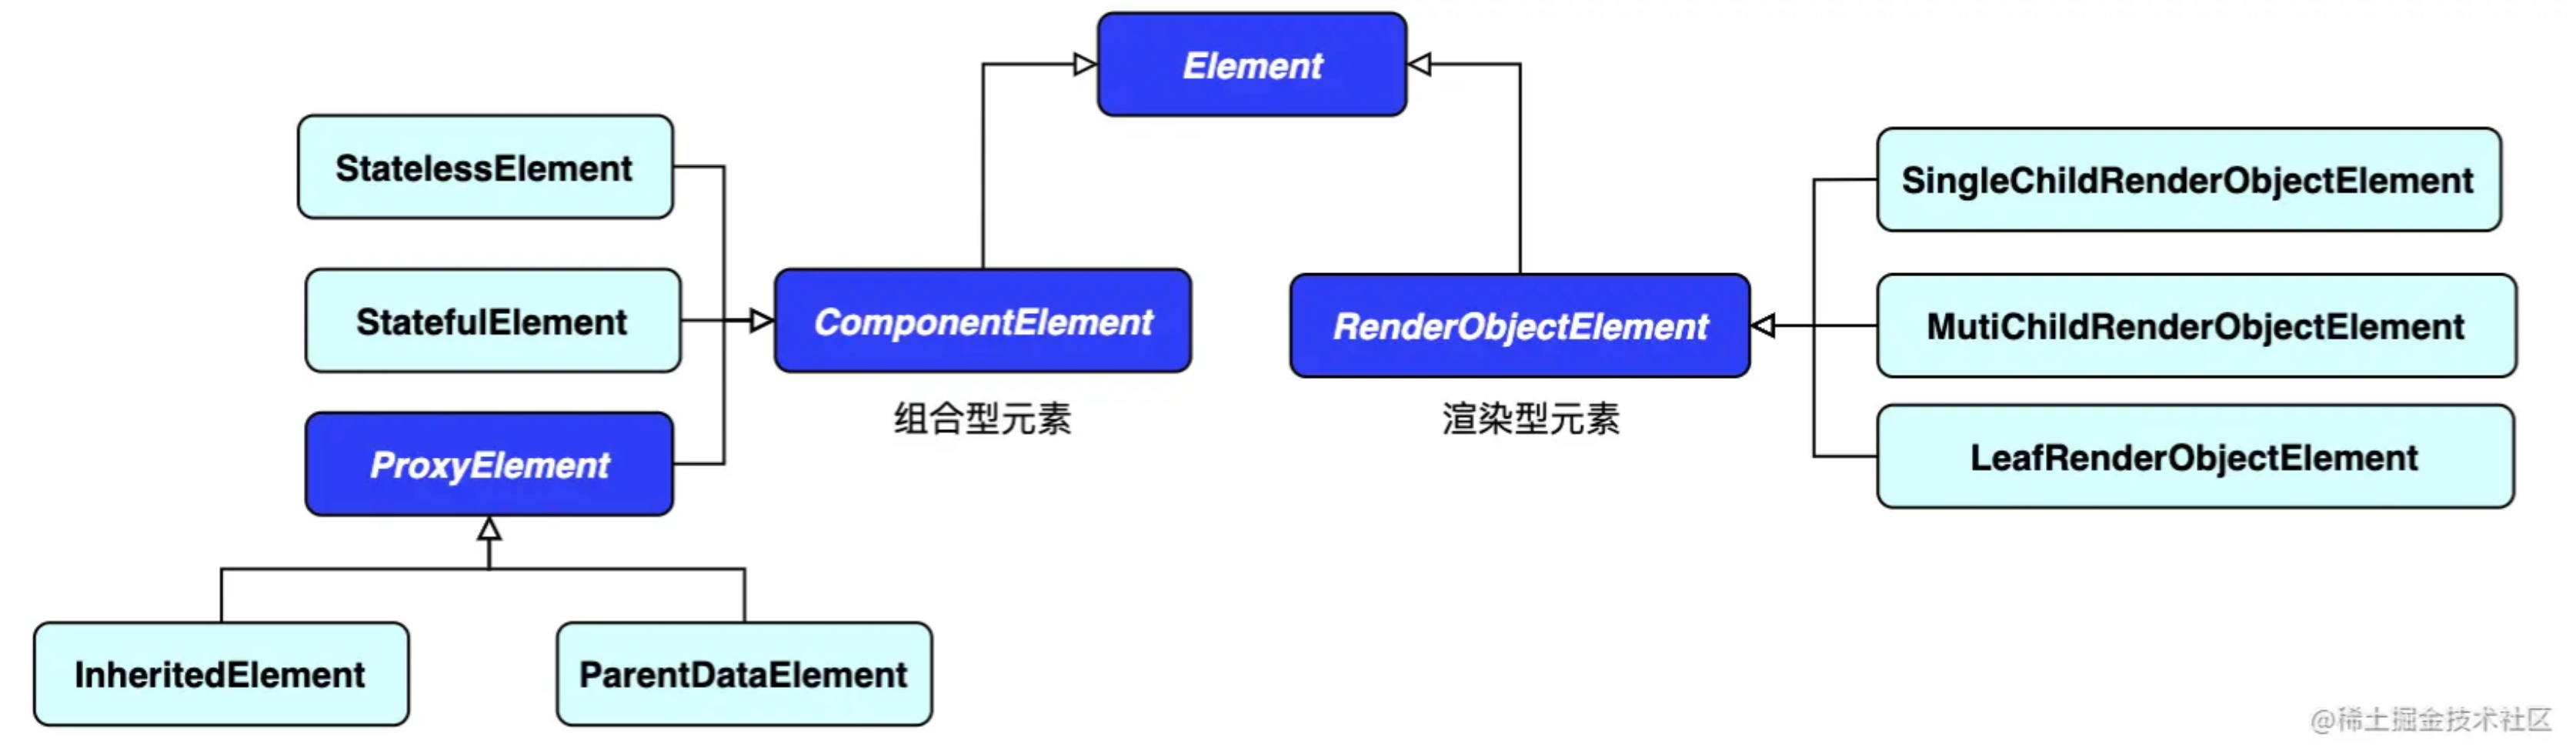
贴出来Element系列的类关系图。
Element Element构造及主要变量 1 2 3 4 5 6 7 8 9 10 11 12 13 14 15 16 17 18 19 20 21 22 23 24 25 26 27 28 29 30 31 32 33 abstract class Element extends DiagnosticableTree implements BuildContext Element (Widget widget) : assert (widget != null ), _widget = widget; Element? _parent; Widget _widget; bool _dirty = true ; BuildOwner**?** _owner**; ****RenderObject? get renderObject { RenderObject? result; void visit(Element element) { assert (result == null ); if (element is RenderObjectElement) result = element.renderObject; else element.visitChildren(visit); } visit(this ); return result; } **... }**
Element.mount和Element.unmount 1 2 3 4 5 6 7 8 9 10 11 12 13 14 15 16 17 18 19 20 21 22 23 24 25 26 27 28 29 30 31 Element .class void mount(Element? parent, Object? newSlot) { _parent = parent; _slot = newSlot; _lifecycleState = _ElementLifecycle.active; _depth = _parent != null ? _parent!.depth + 1 : 1 ; if (parent != null ) { _owner = parent.owner; } final Key? key = widget.key; if (key is GlobalKey) { owner!._registerGlobalKey(key, this ); } _updateInheritance(); } void unmount() { final Key? key = _widget.key; if (key is GlobalKey) { owner!._unregisterGlobalKey(key, this ); } _lifecycleState = _ElementLifecycle.defunct; }
Element的mount方法和unmount都比较简单。
mount方法将element插入到Element树上指定的位置。
但是Element的子类大都对mount方法进行了扩充,这个后面会具体分析。
1 2 3 4 5 6 7 8 9 10 ComponentElement.class void mount(Element? parent, Object? newSlot) { super .mount(parent, newSlot); _firstBuild(); } void _firstBuild() { rebuild(); }
1 2 3 4 5 6 7 8 9 10 RenderObjectElement.class RenderObjectWidget get widget => super .widget as RenderObjectWidget; void mount(Element? parent, Object? newSlot) { super .mount(parent, newSlot); _renderObject = widget.createRenderObject(this ); attachRenderObject(newSlot); _dirty = false ; }
Element.updateChild 1 2 3 4 5 6 7 8 9 10 11 12 13 14 15 16 17 18 19 20 21 22 23 24 25 26 27 28 29 30 31 32 33 Element? updateChild(Element? child, Widget? newWidget, Object? newSlot) { if (newWidget == null ) { if (child != null ) deactivateChild(child); return null ; } final Element newChild; if (child != null ) { bool hasSameSuperclass = true ; if (hasSameSuperclass && child.widget == newWidget) { if (child.slot != newSlot) updateSlotForChild(child, newSlot); newChild = child; } else if (hasSameSuperclass && Widget.canUpdate(child.widget, newWidget)) { if (child.slot != newSlot) updateSlotForChild(child, newSlot); child.update(newWidget); newChild = child; } else { deactivateChild(child); assert (child._parent == null ); newChild = inflateWidget(newWidget, newSlot); } } else { newChild = inflateWidget(newWidget, newSlot); } return newChild; }
newWidget==null
newWidget != null
child == null
returns null.
returns new [Element]
child != null
移除child,returns null
可复用就复用,returns child
各种条件下来其实就是 能更新就更新,否则移除旧的child,创建并返回新的Element。
Element.update 1 2 3 void update(covariant Widget newWidget) { _widget = newWidget; }
update方法很简单,实际上各个子类都对其进行了重写。
1 2 3 4 5 6 7 8 9 10 11 12 13 14 15 16 17 18 19 20 21 22 Element inflateWidget(Widget newWidget, Object? newSlot) { assert (newWidget != null ); final Key? key = newWidget.key; if (key is GlobalKey) { final Element? newChild = _retakeInactiveElement(key, newWidget); if (newChild != null ) { newChild._activateWithParent(this , newSlot); final Element? updatedChild = updateChild(newChild, newWidget, newSlot); return updatedChild!; } } final Element newChild = newWidget.createElement(); newChild.mount(this , newSlot); return newChild; }
Element其他方法 1 2 3 4 5 6 7 8 9 10 11 12 13 14 15 16 17 18 19 20 21 void didChangeDependencies() { markNeedsBuild(); } void markNeedsBuild() { if (_lifecycleState != _ElementLifecycle.active) return ; if (dirty) return ; _dirty = true ; owner!.scheduleBuildFor(this ); } void rebuild() { if (_lifecycleState != _ElementLifecycle.active || !_dirty) return ; performRebuild(); } void performRebuild();
Element的主要源码到这就差不多结束了。其实整个看下来,除了在构造时入参了Widget,整个看下来和Widget的关联并不是很大。其实不然,还需要看看Element的子类源码才能看清楚他们之间的关联。
组合型Element 1 2 3 4 5 6 7 8 9 10 11 12 13 14 15 16 17 18 19 20 21 22 23 24 25 26 27 28 29 30 31 32 33 34 35 36 37 38 39 40 41 42 43 44 45 abstract class ComponentElement extends Element ComponentElement(Widget widget) : super (widget); Element? _child; @override void mount(Element? parent, Object? newSlot) { super .mount(parent, newSlot); _firstBuild(); } void _firstBuild() { rebuild(); } @override void performRebuild() { Widget? built; try { built = build(); } catch (e, stack) { } finally { _dirty = false ; } try { _child = updateChild(_child, built, slot); } catch (e, stack) { _child = updateChild(null , built, slot); } } @protected Widget build(); }
组合型Element的mount方法经过_firstBuild->rebuild->performRebuild;最终会调用build方法创建Widget,然后调用updateChild方法更新子节点。
对于StatelessElement.build→StatelessWidget.build方法
对于StatefulElement.build→StatefulWidget.state.build方法
这里我们就知道了widget.build方法第一次调用是在Element.mount调用的时候被调用的。
1 2 3 4 5 6 7 8 9 10 11 12 13 14 15 16 17 18 19 20 21 22 23 24 25 26 27 28 29 30 31 32 33 34 35 36 37 38 39 40 41 42 43 44 class StatelessElement extends ComponentElement @override Widget build() => widget.build(this ); @override void update(StatelessWidget newWidget) { super .update(newWidget); _dirty = true ; rebuild(); } } class StatefulElement extends ComponentElement @override Widget build() => state.build(this ); @override void update(StatefulWidget newWidget) { super .update(newWidget); final StatefulWidget oldWidget = state._widget!; _dirty = true ; state._widget = widget as StatefulWidget; try { final Object? debugCheckForReturnedFuture = state.didUpdateWidget(oldWidget) as dynamic ; } finally { } rebuild(); } abstract class ProxyElement extends ComponentElement @override Widget build() => widget.child; @override void update(ProxyWidget newWidget) { final ProxyWidget oldWidget = widget; super .update(newWidget); updated(oldWidget); _dirty = true ; rebuild(); } }
StatelessElement,StatefulElement,ProxyElement的update→rebuild→performRebuild,会再次触发各自的build方法。
渲染型Element 渲染型的Element比较复杂,后面再补充